Showing posts with label Microsoft Office Outlook 2007. Show all posts

Tasks Basics

Leave a Comment
Tasks Basics
The tasks function of Microsoft Outlook is a way to keep track of daily, weekly, monthly and even yearly “to do” items. You can use tasks to help remind you of once-in-a-while tasks that you must get done, or recurring tasks that happen all the time.
Creating Tasks
·          Click New in the Menu Bar.
  • Click Task in the drop down menu. 

  • The New Task window will open.  In this window you can:
    1. Enter a subject for the Task.
    2. Enter a start and end date.
    3. Enter a status.
    4. Assign a priority level.
    5. Add a reminder.
    6. Set the recurrence of the Task.
    7. Set a follow-up reminder.
    8. Assign the task to someone else.
    9. Categorize the task.
    10. Type notes for the task.
·          When you are done filling in the New Task window, Click Save and Close.
Viewing Tasks/To-Do List
Your new task is now visible in two places:
·          The To-Do bar lists Tasks on the right side of the outlook screen.
  • Double click a Task in the To-Do bar view and edit the Task.

OR
  • Click Tasks in the Navigation Pane.  This will open the Tasks view of the Outlook screen.

  • You can view the details of a Task in the Reading Pane.


Read More

Contact Basics

Leave a Comment
Contact Basics
Global Address List vs Personal Address Book (Contacts)
You have two main ways of getting access to and storing contacts. You have access to a Global Address List that contains everyone who has an NU e-mail address and a Personal Address Book for contacts inside or outside of the University.  To access the Global Address List:
·          Click Address Book on the right side of Menu Bar.  The Address Book window will open.
  • Type a name into the search box.  As you type, the search function will display possible matches.
  • Click the name of the person for whom you are looking.  A new window will pop up with this persons’ contact information.
  • Click Add to Contacts to add them to your personal address book.  A new window will pop up.
  • Click Save and Close.  They will appear in your Personal Address Book.
To Access your Personal Address Book (Contacts):
  • Click Contacts in the Navigation Pane.  Your contact list will open on the Outlook screen.
  • You can add new contacts, add contact groups, delete contacts, e-mail contacts and invite contacts to meetings from this screen.


Read More

Calendar Basics

Leave a Comment
Calendar Basics
Outlook 2010 has a robust calendar feature for managing your time and scheduling meetings with other NU users.
Access the Outlook Calendar
  • Click on Calendar in the Navigation Pane.  The calendar will appear in the Outlook Screen.


Adding an Appointment
There are two ways to add an appointment to your calendar:
·          Click New Appointment in the Menu Bar.
  • Select Appointment in the drop down menu.


  • OR
    Double click an area on your calendar.


  • The Appointment window will open.
  • Type a subject for your appointment in the Subject field.
  • Type a location for your appointment in the Location field.
  • Set a start and end date and time for your appointment.
  • Type a note for your appointment in the large text box.
  • Click in the Reminder field in the ribbon to set a reminder for your appointment.  Reminders can be scheduled for five minutes to two weeks before the appointment.

  • Click Save & Close in the ribbon.  Your appointment will appear in your calendar.

Adding a Meeting Request
Meetings differ from appointments in that a meeting allows you to invite attendees and reserve rooms and resources at Northwestern.  When you create a meeting request, invited users will receive an e-mail invitation to which they can respond.  You will receive notification when users accept, decline or propose a new time for the meeting.
Invite users to the meeting by following the same steps as adding addresses to a mail message; auto-complete attempts to predict what e-mail address you’re typing based on the addresses you’ve e-mailed in the past, while the Global Address List provides a university-wide contact list of NU employees.
There are two ways to access the New Meeting window.
·          Click on New Items in the Menu Bar.
  • Click Meeting Request in the drop down menu.


  • The New Meeting window will open. 
  • Type a subject for your meeting in the Subject field.
  • Type a location for your meeting in the Location field.
  • Type a note about your meeting in the large text box.

  • Click in the To… text box and begin typing the name or address of an attendee.  Auto-complete will suggest a recipient.  Hit Enter on the keyboard to accept a suggestion.

  • Type the name of an attendee in the To… field.  Hit Ctrl-K on your keyboard and select the attendee you want from the list that appears.  Click OK.

  • Selected attendees will appear in the To… field.
  • Select a date and time for the meeting.
  • Click Send to send the invitation.  Attendees receive an e-mail invitation to the meeting, and you will be notified if they accept or decline.


Read More

E-mail Basics: Signatures

Leave a Comment
E-mail Basics:  Signatures
Creating a Signature
Outlook 2010 allows you to create custom signatures for your messages.  You may create multiple signatures to apply to messages as you see fit.  Your first signature is automatically applied as your default signature and will appear on your outgoing messages.
·          Click New in the Menu Bar and select Mail Message in the drop down window.  The new e-mail window will open
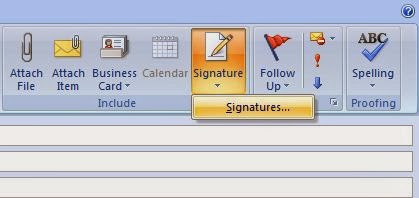
·          Click Signature in the New E-Mail menu.
·         Click Signatures… in the drop down menu.  The Signatures and Stationary window will open.
·       Click New to create a new signature.
·          Type the name of your signature in the New Signature window that appears.
·         Click OK.
·          Type your desired signature in the text box below.
·          Click Save to save your signature.
·          Add additional signatures or Click OK to exit.

Inserting a Signature
If you have created more than one signature, you can select which one you wish to use while composing a new message.
·          Open the New E-Mail window.
·          Click Signature in the New E-Mail ribbon.  A list of the signatures you have created will appear in the drop down menu.
·          Click on the signature you wish to use.
·         The signature will appear in at the bottom of your message.
Read More